install setup : Kubernetes
Created 목요일 20 2월 2017
automating deployment, scaling, and management of containerized applications.
1. Introduce
2. Architecture
1. Concept/Features
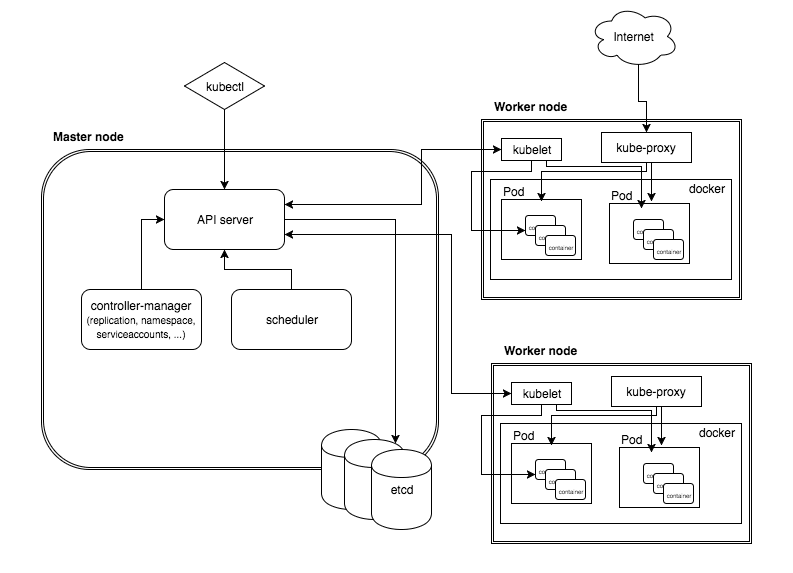
Master Node
- API server
- etcd storage
- scheduler
- controller-manager
Worker node
- Docker
- kubelet
- kube-proxy
- kubectl
kubernetes default ports
| Node | Protocol | Direction | Port Range | Purpose | Used By |
|---|---|---|---|---|---|
| Master | TCP | Inbound | 6443 | Kubernetes API server | All |
| Master | TCP | Inbound | 2379-2380 | etcd server client API | kube-apiserver, etcd |
| Master | TCP | Inbound | 10250 | Kubelet API | Self, Control plane |
| Master | TCP | Inbound | 10251 | kube-scheduler | Selfkubeadm init options |
| Master | TCP | Inbound | 10252 | kube-controller-manager | Self |
| Worker | TCP | Inbound | 10250 | Kubelet API | Self, Control plane |
| Worker | TCP | Inbound | 30000-32767 | NodePort Services | All |
3. Terms, Abbreviation
- FT(Fault Tolerance) 작은 장애에도 동작이 멈추지 않고 서비스가 지속. Fail-over 시 일시적 서비스 중단. 오류/장애 누적으로 단계별 성능저하(graceful degradation) 현상이 발생할 수 있음.
- HA(High availability)
이중화 시스템 (Fault-tolerance by replication)
- 리플리케이션(Replication) 동일한 시스템을 복수로 준비하여 병렬로 실행시켜 다수를 만족한 결과를 올바른 결과적으로 적용한다.
- 다중화(Redundancy) 동일한 시스템의 복수로 준비하여 장애가 일어나면 보조 시스템으로 전환한다.
- 다양화(Diversity) 같은 사양에 다른 하드웨어 시스템을 복수로 준비하여 복제화와 같이 그것을 운용한다. 이 경우, 각 시스템이 똑같은 장애를 일으키지 않는다.
- 동작 지속 (No Single Point of Repair 시스템이 고장 나더라도 지속적으로 동작해야 하며, 복구 작업을 하는 동안 성능 간섭이 없어야 한다.
- 고장 분리 (Fault Isolation to the Failing Component) 고장이 발생할 때 시스템은 고장과 분리되어 정상적인 구성 요소에 영향을 주지 말아야 한다. 이것은 고장 감지 메커니즘이 고장과 분리를 목적으로 존재함을 나타낸다.
- 고장 전염 (Fault Containment) 어떤 고장 메커니즘은 시스템을 고장나게 하는 원인이 될 수 있는데 나머지 시스템에게 고장을 전파한다. 예를 들어, “Rogue transmitter”는 정상적인 통신 상태를 문제를 만들어 버리고 모든 시스템을 고장나게 한다. “Rogue transmitter”를 격리하는 메커니즘 또는 구성 요소를 잘못되게 하는 것으로부터 보호하는 시스템이 필요하다.
Installation/Setup/Configuration
1. Pre-installation setup
A. creating required operating system group and user
Create operating system group and user
B. install dependency packages
Kubernetes는 docker를 기반으로 컨테이너화된 어플리케이션을 관리하는 오픈 소스 솔루션으로 docker가 설치 되어 있어야 한다.
C. creating base directory
D. firewall configuration
2. installation setup
A. change account
$ su - app
B. creating application directory
make directory
$ mkdir -p /apps/docker
$ mkdir -p /data/docker
$ mkdir -p /logs/docker
C. download
D. install
ubuntu
$ sudo apt install apt-transport-https
$ curl -s https://packages.cloud.google.com/apt/doc/apt-key.gpg | sudo apt-key add
$ sudo add-apt-repository “deb https://apt.kubernetes.io/ kubernetes-$(lsb_release -cs) main”
$ cat <<EOF > /etc/apt/sources.list.d/kubernetes.list
deb http://apt.kubernetes.io/ kubernetes-xenial main
EOF
$ sudo apt update
$ sudo apt install kubelet kubeadm kubectl kubernetes-cni
2019.04.24 아직 18.04를 지원하지 않는다.
E: The repository 'https://apt.kubernetes.io kubernetes-bionic Release' does not have a Release file$ vi /etc/apt/sources.list
centos
$ sudo vi /etc/yum.repos.d/kubernetes.repo
[kubernetes]
name=Kubernetes
baseurl=https://packages.cloud.google.com/yum/repos/kubernetes-el7-x86_64
enabled=1
gpgcheck=1
repo_gpgcheck=1
gpgkey=https://packages.cloud.google.com/yum/doc/yum-key.gpg https://packages.cloud.google.com/yum/doc/rpm-package-key.gpg
exclude=kube*
$ sudo yum update
$ sudo yum install -y kubelet kubeadm kubectl –disableexcludes=kubernetes
$ sudo systemctl enable kubelet && systemctl start kubelet
command
- kubeadm : 클러스터를 bootstrap 하는 명령.
- kubelet : 모든 Cluster nodes에서 실행. pod 및 container 시작과 같은 작업을 수행.
- kubectl : 클러스터와 대화하기 위한 명령 유틸리티.
swap 제거
scheduler가 machine(node)에 pod 배치 시 swap을 사용하지 않도록 (기본적으로 시스템에서 스왑을 사용하면 기본적으로 kubelet이 시작되지 않는다.)
재부팅 등에도 영구적으로 적용하기 위해 /etc/fstab에 # swap 관련 부분 주석처리
$ sudo sed -i ‘/ swap / s/^(.*)$/#\1/g’ /etc/fstab
$ vi /etc/fstab
error : sed: -e expression #1, char 23: invalid reference \1 on `s’ command’s RHS
$ sudo sed -r -i ‘/ swap / s/^(.*)$/#\1/g’ /etc/fstab
swap off
$ sudo su -
$ swapoff -a
ref. 스왑메모리 생성 : mkswap 스왑메모리 활성화 : swapon 스왑메모리 비활성화 : swapoff
여기까지는 Master/Worker Node 공통 설치항목이다.
Master Node
$ hostnamectl set-hostname ‘k8-master’
방화벽 포트 설정
$ firewall-cmd –zone=public –permanent –add-port=6443/tcp
$ firewall-cmd –zone=public –permanent –add-port=2379-2380/tcp
$ firewall-cmd –zone=public –permanent –add-port=10250/tcp
$ firewall-cmd –zone=public –permanent –add-port=10251/tcp
$ firewall-cmd –zone=public –permanent –add-port=10252/tcp
$ firewall-cmd –reload
$ sudo sysctl net.bridge.bridge-nf-call-iptables=1
$ cat «EOF > /etc/sysctl.d/k8s.conf
net.bridge.bridge-nf-call-ip6tables = 1
net.bridge.bridge-nf-call-iptables = 1
EOF
$ sysctl –system
kubeadm init options
--apiserver-advertise-address string	The IP address the API Server will advertise it's listening on. If not set the default network interface will be used.
--apiserver-bind-port int32				Port for the API Server to bind to. (default 6443)
--apiserver-cert-extra-sans strings		Optional extra Subject Alternative Names (SANs) to use for the API Server serving certificate. Can be both IP addresses and DNS names.
--cert-dir strings 						The path where to save and store the certificates. (default "/etc/kubernetes/pki")
--certificate-key string 				Key used to encrypt the control-plane certificates in the kubeadm-certs Secret.
--config string 						Path to a kubeadm configuration file.
--cri-socket string 					Path to the CRI socket to connect. If empty kubeadm will try to auto-detect this value; use this option only if you have more than one CRI installed or if you have non-standard CRI socket.
--dry-run								Don't apply any changes; just output what would be done.
--feature-gates strings					A set of key=value pairs that describe feature gates for various features. No feature gates are available in this release.
-h, --help								help for init
--ignore-preflight-errors strings		A list of checks whose errors will be shown as warnings. Example: 'IsPrivilegedUser,Swap'. Value 'all' ignores errors from all checks.
--image-repository string				Choose a container registry to pull control plane images from (default "k8s.gcr.io")
--kubernetes-version string 			Choose a specific Kubernetes version for the control plane. (default "stable-1")
--node-name string 						Specify the node name.
--pod-network-cidr string 				Specify range of IP addresses for the pod network. If set, the control plane will automatically allocate CIDRs for every node.
--service-cidr string 					Use alternative range of IP address for service VIPs. (default "10.96.0.0/12")
--service-dns-domain string 			Use alternative domain for services, e.g. "myorg.internal". (default "cluster.local")
--skip-certificate-key-print 			Don't print the key used to encrypt the control-plane certificates.
--skip-phases strings 					List of phases to be skipped
--skip-token-print						Skip printing of the default bootstrap token generated by 'kubeadm init'.
--token strings 						The token to use for establishing bidirectional trust between nodes and control-plane nodes. The format is [a-z0-9]{6}\.[a-z0-9]{16} - e.g. abcdef.0123456789abcdef
--token-ttl duration					The duration before the token is automatically deleted (e.g. 1s, 2m, 3h). If set to '0', the token will never expire (default 24h0m0s)
--upload-certs							Upload control-plane certificates to the kubeadm-certs Secret.
$ sudo kubeadm init –pod-network-cidr 10.244.0.0/16 –service-dns-domain “mobon.platform”
–apiserver-advertise-address : 서버 IP
–apiserver-bind-port : (default 6443)
–service-cidr : (default “10.96.0.0/12”)
–service-dns-domain : (default “cluster.local”)
–ignore-preflight-errors=all : 에러 무시(swap 등)
–token-ttl 0 : 토큰이 만료되지 않도록 설정(default 24h0m0s)
$ sudo kubeadm init –ignore-preflight-errors=all –pod-network-cidr 10.244.0.0/16 –service-cidr 10.96.0.0/12 –service-dns-domain “cluster.local” –apiserver-advertise-address 172.20.0.31 –apiserver-bind-port 6443 –token-ttl 0
```$ sudo kubeadm init –pod-network-cidr=10.244.0.0/16
[init] Using Kubernetes version: v1.14.1
[preflight] Running pre-flight checks
	[WARNING IsDockerSystemdCheck]: detected "cgroupfs" as the Docker cgroup driver. The recommended driver is "systemd". Please follow the guide at https://kubernetes.io/docs/setup/cri/
[preflight] Pulling images required for setting up a Kubernetes cluster
[preflight] This might take a minute or two, depending on the speed of your internet connection
[preflight] You can also perform this action in beforehand using 'kubeadm config images pull'
[kubelet-start] Writing kubelet environment file with flags to file "/var/lib/kubelet/kubeadm-flags.env"
[kubelet-start] Writing kubelet configuration to file "/var/lib/kubelet/config.yaml"
[kubelet-start] Activating the kubelet service
[certs] Using certificateDir folder "/etc/kubernetes/pki"
[certs] Generating "front-proxy-ca" certificate and key
[certs] Generating "front-proxy-client" certificate and key
[certs] Generating "etcd/ca" certificate and key
[certs] Generating "etcd/healthcheck-client" certificate and key
[certs] Generating "etcd/peer" certificate and key
[certs] etcd/peer serving cert is signed for DNS names [arch-x230 localhost] and IPs [192.168.100.12 127.0.0.1 ::1]
[certs] Generating "apiserver-etcd-client" certificate and key
[certs] Generating "etcd/server" certificate and key
[certs] etcd/server serving cert is signed for DNS names [arch-x230 localhost] and IPs [192.168.100.12 127.0.0.1 ::1]
[certs] Generating "ca" certificate and key
[certs] Generating "apiserver" certificate and key
[certs] apiserver serving cert is signed for DNS names [arch-x230 kubernetes kubernetes.default kubernetes.default.svc kubernetes.default.svc.cluster.local] and IPs [10.96.0.1 192.168.100.12]
[certs] Generating "apiserver-kubelet-client" certificate and key
[certs] Generating "sa" key and public key
[kubeconfig] Using kubeconfig folder "/etc/kubernetes"
[kubeconfig] Writing "admin.conf" kubeconfig file
[kubeconfig] Writing "kubelet.conf" kubeconfig file
[kubeconfig] Writing "controller-manager.conf" kubeconfig file
[kubeconfig] Writing "scheduler.conf" kubeconfig file
[control-plane] Using manifest folder "/etc/kubernetes/manifests"
[control-plane] Creating static Pod manifest for "kube-apiserver"
[control-plane] Creating static Pod manifest for "kube-controller-manager"
[control-plane] Creating static Pod manifest for "kube-scheduler"
[etcd] Creating static Pod manifest for local etcd in "/etc/kubernetes/manifests"
[wait-control-plane] Waiting for the kubelet to boot up the control plane as static Pods from directory "/etc/kubernetes/manifests". This can take up to 4m0s
[apiclient] All control plane components are healthy after 17.504230 seconds
[upload-config] storing the configuration used in ConfigMap "kubeadm-config" in the "kube-system" Namespace
[kubelet] Creating a ConfigMap "kubelet-config-1.14" in namespace kube-system with the configuration for the kubelets in the cluster
[upload-certs] Skipping phase. Please see --experimental-upload-certs
[mark-control-plane] Marking the node arch-x230 as control-plane by adding the label "node-role.kubernetes.io/master=''"
[mark-control-plane] Marking the node arch-x230 as control-plane by adding the taints [node-role.kubernetes.io/master:NoSchedule]
[bootstrap-token] Using token: fpcq1q.nb2okgy5x2r6xlxz
[bootstrap-token] Configuring bootstrap tokens, cluster-info ConfigMap, RBAC Roles
[bootstrap-token] configured RBAC rules to allow Node Bootstrap tokens to post CSRs in order for nodes to get long term certificate credentials
[bootstrap-token] configured RBAC rules to allow the csrapprover controller automatically approve CSRs from a Node Bootstrap Token
[bootstrap-token] configured RBAC rules to allow certificate rotation for all node client certificates in the cluster
[bootstrap-token] creating the "cluster-info" ConfigMap in the "kube-public" namespace
[addons] Applied essential addon: CoreDNS
[addons] Applied essential addon: kube-proxy

Your Kubernetes control-plane has initialized successfully!

To start using your cluster, you need to run the following as a regular user:

  mkdir -p $HOME/.kube
  sudo cp -i /etc/kubernetes/admin.conf $HOME/.kube/config
  sudo chown $(id -u):$(id -g) $HOME/.kube/config

You should now deploy a pod network to the cluster.
Run "kubectl apply -f [podnetwork].yaml" with one of the options listed at:
  https://kubernetes.io/docs/concepts/cluster-administration/addons/

Then you can join any number of worker nodes by running the following on each as root:

kubeadm join 192.168.100.12:6443 --token fpcq1q.nb2okgy5x2r6xlxz \
    --discovery-token-ca-cert-hash sha256:4574c39be1691106f94bf18ff5d4e9c2c45f390ea53d3786dac4880320778203
메세지 중 아래 내용은 Work Nodes 연동 시 필요한 정보이므로 백업해 둔다.
… Then you can join any number of worker nodes by running the following on each as root:
kubeadm join 192.168.100.12:6443
--token fpcq1q.nb2okgy5x2r6xlxz
--discovery-token-ca-cert-hash sha256:4574c39be1691106f94bf18ff5d4e9c2c45f390ea53d3786dac4880320778203
kubeadm join 172.20.0.104:6443 –token 22rg67.kkyv4t67cuhq5tm1
–discovery-token-ca-cert-hash sha256:8a6ee758cb7e190076ca14b83b044ee5f0694226c10764019de9196ac24a1b93
kubeadm join 192.168.100.37:6443 –token ky7keu.6kmochsm8hee60dv
–discovery-token-ca-cert-hash sha256:f007f27ff415adf3fb5aeb00f12eecedfb53bcdabd352516b90e6cbd07180054
kubeadm join 172.20.0.31:6443 –token cl9ae5.6ybdxgycoqglyjo9
–discovery-token-ca-cert-hash sha256:4ddb92af1f45ee771dc8ecfcddfa516440641ff6547490a9e6a9eb30e1ff0637
root 이외 계정에서 사용 시 아래와 같이 환경 설정을 추가한다.
$ mkdir -p $HOME/.kube
$ sudo cp -i /etc/kubernetes/admin.conf $HOME/.kube/config
$ sudo chown $(id -u):$(id -g) $HOME/.kube/config
$ export KUBECONFIG=$HOME/.kube/config
Pod Network 추가
Kubernates를 지원하는 컨테이너 네트워크 목록
http://kubernetes.io/docs/admin/addons/
install flannel
$ kubectl apply -f https://raw.githubusercontent.com/coreos/flannel/master/Documentation/kube-flannel.yml
podsecuritypolicy.extensions/psp.flannel.unprivileged created
clusterrole.rbac.authorization.k8s.io/flannel configured
clusterrolebinding.rbac.authorization.k8s.io/flannel unchanged
serviceaccount/flannel unchanged
configmap/kube-flannel-cfg configured
daemonset.extensions/kube-flannel-ds-amd64 created
daemonset.extensions/kube-flannel-ds-arm64 created
daemonset.extensions/kube-flannel-ds-arm created
daemonset.extensions/kube-flannel-ds-ppc64le created
daemonset.extensions/kube-flannel-ds-s390x created
$ kubectl apply -f https://raw.githubusercontent.com/coreos/flannel/master/Documentation/k8s-manifests/kube-flannel-legacy.yml
$ kubectl apply -f https://raw.githubusercontent.com/coreos/flannel/master/Documentation/k8s-manifests/kube-flannel-rbac.yml
install Calico container network$ kubectl apply -f https://docs.projectcalico.org/v3.6/getting-started/kubernetes/installation/hosted/kubernetes-datastore/calico-networking/1.7/calico.yamlconfigmap/calico-config configured customresourcedefinition.apiextensions.k8s.io/felixconfigurations.crd.projectcalico.org created customresourcedefinition.apiextensions.k8s.io/ipamblocks.crd.projectcalico.org created customresourcedefinition.apiextensions.k8s.io/blockaffinities.crd.projectcalico.org created customresourcedefinition.apiextensions.k8s.io/ipamhandles.crd.projectcalico.org created customresourcedefinition.apiextensions.k8s.io/ipamconfigs.crd.projectcalico.org created customresourcedefinition.apiextensions.k8s.io/bgppeers.crd.projectcalico.org created customresourcedefinition.apiextensions.k8s.io/bgpconfigurations.crd.projectcalico.org created customresourcedefinition.apiextensions.k8s.io/ippools.crd.projectcalico.org created customresourcedefinition.apiextensions.k8s.io/hostendpoints.crd.projectcalico.org created customresourcedefinition.apiextensions.k8s.io/clusterinformations.crd.projectcalico.org created customresourcedefinition.apiextensions.k8s.io/globalnetworkpolicies.crd.projectcalico.org created customresourcedefinition.apiextensions.k8s.io/globalnetworksets.crd.projectcalico.org created customresourcedefinition.apiextensions.k8s.io/networkpolicies.crd.projectcalico.org created clusterrole.rbac.authorization.k8s.io/calico-kube-controllers configured clusterrolebinding.rbac.authorization.k8s.io/calico-kube-controllers unchanged clusterrole.rbac.authorization.k8s.io/calico-node created clusterrolebinding.rbac.authorization.k8s.io/calico-node created daemonset.extensions/calico-node configured serviceaccount/calico-node created deployment.extensions/calico-kube-controllers configured serviceaccount/calico-kube-controllers unchanged
install weave$ kubectl apply -f “https://cloud.weave.works/k8s/net?k8s-version=$(kubectl version | base64 | tr -d ‘\n’)”serviceaccount/weave-net created clusterrole.rbac.authorization.k8s.io/weave-net created clusterrolebinding.rbac.authorization.k8s.io/weave-net created role.rbac.authorization.k8s.io/weave-net created rolebinding.rbac.authorization.k8s.io/weave-net created daemonset.extensions/weave-net created
ref. weave: https://www.weave.works/docs/net/latest/kubernetes/kube-addon/
- calico 설치 과정은 skip해도 된다
- weave는 컨테이너간 multicast 통신이 가능하며, Calico와 비슷하게 Network Policy 기능까지 제공
- yaml 파일로 저장해서 사용하거나 일부를 수정하여 사용하려면 $ curl -fsSLo weave-daemonset.yaml “https://cloud.weave.works/k8s/net?k8s-version=$(kubectl version | base64 | tr -d ‘\n’)” 로 다운로드 받은 후 사용
Cluster Nodes 확인
$ kubectl get nodes
NAME STATUS ROLES AGE VERSION
arch-x230 Ready master 86m v1.14.1
NAME STATUS ROLES AGE VERSION mdev-cache-01 Ready master 4m55s v1.14.1NAME STATUS ROLES AGE VERSION tf-01 Ready master 173m v1.15.0
Status NotReady
NAME STATUS ROLES AGE VERSION arch-x230 NotReady master 20m v1.14.1$ kubectl get nodes | grep ‘^.notReay.$’ | awk ‘{print $1}’ | xargs kubectl describe node
$ kubectl describe node arch-x230message : network plugin is not ready
... runtime network not r#### eady: NetworkReady=false reason:NetworkPluginNotReady message:docker: network plugin is not ready: cni config uninitialized
Kubernates를 지원하는 컨테이너 네트워크 목록
http://kubernetes.io/docs/admin/addons/
Calico container network 설치
$ kubectl apply -f https://docs.projectcalico.org/v3.6/getting-started/kubernetes/installation/hosted/kubernetes-datastore/calico-networking/1.7/calico.yaml
configmap/calico-config configured
customresourcedefinition.apiextensions.k8s.io/felixconfigurations.crd.projectcalico.org created
customresourcedefinition.apiextensions.k8s.io/ipamblocks.crd.projectcalico.org created
customresourcedefinition.apiextensions.k8s.io/blockaffinities.crd.projectcalico.org created
customresourcedefinition.apiextensions.k8s.io/ipamhandles.crd.projectcalico.org created
customresourcedefinition.apiextensions.k8s.io/ipamconfigs.crd.projectcalico.org created
customresourcedefinition.apiextensions.k8s.io/bgppeers.crd.projectcalico.org created
customresourcedefinition.apiextensions.k8s.io/bgpconfigurations.crd.projectcalico.org created
customresourcedefinition.apiextensions.k8s.io/ippools.crd.projectcalico.org created
customresourcedefinition.apiextensions.k8s.io/hostendpoints.crd.projectcalico.org created
customresourcedefinition.apiextensions.k8s.io/clusterinformations.crd.projectcalico.org created
customresourcedefinition.apiextensions.k8s.io/globalnetworkpolicies.crd.projectcalico.org created
customresourcedefinition.apiextensions.k8s.io/globalnetworksets.crd.projectcalico.org created
customresourcedefinition.apiextensions.k8s.io/networkpolicies.crd.projectcalico.org created
clusterrole.rbac.authorization.k8s.io/calico-kube-controllers configured
clusterrolebinding.rbac.authorization.k8s.io/calico-kube-controllers unchanged
clusterrole.rbac.authorization.k8s.io/calico-node created
clusterrolebinding.rbac.authorization.k8s.io/calico-node created
daemonset.extensions/calico-node configured
serviceaccount/calico-node created
deployment.extensions/calico-kube-controllers configured
serviceaccount/calico-kube-controllers unchanged
POD 정보 확인
$ kubectl get pods –all-namespaces
NAMESPACE     NAME                                    READY   STATUS    RESTARTS   AGE
kube-system   coredns-fb8b8dccf-9tmqq                 1/1     Running   0          2m24s
kube-system   coredns-fb8b8dccf-p76q8                 1/1     Running   0          2m24s
kube-system   etcd-mdev-cache-01                      1/1     Running   0          104s
kube-system   kube-apiserver-mdev-cache-01            1/1     Running   0          82s
kube-system   kube-controller-manager-mdev-cache-01   1/1     Running   0          77s
kube-system   kube-flannel-ds-amd64-8mp8w             1/1     Running   0          31s
kube-system   kube-proxy-h7866                        1/1     Running   0          2m24s
kube-system   kube-scheduler-mdev-cache-01            1/1     Running   0          84s
Cluster Node 상세 설정 보기
$ kubectl describe node arch-x230
$ kubectl describe node mdev-cache-01
scheduling에서 master node의 pods 제외
$ kubectl taint nodes –all node-role.kubernetes.io/master-
$ kubectl taint nodes –all node-role.kubernetes.io/master-node/k8s-master untainted
Worker Node
$ hostnamectl set-hostname ‘k8-worker-01’ $ hostnamectl set-hostname ‘k8-worker-02’node/k8s-master untainted
방화벽 포트 설정
$ firewall-cmd –zone=public –permanent –add-port=10250/tcp $ firewall-cmd –zone=public –permanent –add-port=30000-32767/tcp $ firewall-cmd –reload
기본 Kubernetes 패키지를 설치하여 한다. : docker, kubelet, kubeadm, kubectl 설치 및 활성화
$ sudo kubeadm join 192.168.100.12:6443 –token fpcq1q.nb2okgy5x2r6xlxz –discovery-token-ca-cert-hash sha256:4574c39be1691106f94bf18ff5d4e9c2c45f390ea53d3786dac4880320778203
신규 키 발급 (Master Node)
token expire 등에 의해 키를 재발급 해야 할 경우 $ kubeadm token create
n5hr8c.wvbge1yy4oxegb2b$ openssl x509 -pubkey -in /etc/kubernetes/pki/ca.crt | openssl rsa -pubin -outform der 2>/dev/null | openssl dgst -sha256 -hex | sed ‘s/^.* //’
d2192540f19112f5ccb5adb47901fc5016fc77e5208837f8118a08ce50f39ca0
Master node에서 Worker Node 추가 확인
$ kubectl get nodes
Web UI (Dashboard) 설치
Master node에서 실행
$ kubectl create -f https://raw.githubusercontent.com/kubernetes/dashboard/master/aio/deploy/recommended/kubernetes-dashboard.yaml
kubernetes-dashboard pod
$ kubectl get pods –all-namespaces
NAMESPACE     NAME                                       READY   STATUS    RESTARTS   AGE
...
kube-system   kubernetes-dashboard-5f7b999d65-67xz4      1/1     Running   0          23s
...
접속을 위한 바인딩 정보 확인$ kubectl -n kube-system get service kubernetes-dashboardNAME TYPE CLUSTER-IP EXTERNAL-IP PORT(S) AGE kubernetes-dashboard ClusterIP 10.102.183.54 <none> 443/TCP 3m49s
NodePort
Dashboard 서비스 설정 변경
$ kubectl -n kube-system edit service kubernetes-dashboard
# Please edit the object below. Lines beginning with a '#' will be ignored,
# and an empty file will abort the edit. If an error occurs while saving this file will be
# reopened with the relevant failures.
#
apiVersion: v1
kind: Service
metadata:
  creationTimestamp: "2019-04-25T09:33:59Z"
  labels:
    k8s-app: kubernetes-dashboard
  name: kubernetes-dashboard
  namespace: kube-system
  resourceVersion: "1878"
  selfLink: /api/v1/namespaces/kube-system/services/kubernetes-dashboard
  uid: 414099b7-673d-11e9-9202-ecebb898c114
spec:
  clusterIP: 10.98.252.101
  ports:
  - port: 443
    protocol: TCP
    targetPort: 8443
  selector:
    k8s-app: kubernetes-dashboard
  sessionAffinity: None
#  type: ClusterIP
  type: NodePort
status:
  loadBalancer: {}
접속을 위한 바인딩 정보 확인
$ kubectl -n kube-system get service kubernetes-dashboard
NAME                   TYPE       CLUSTER-IP      EXTERNAL-IP   PORT(S)         AGE
kubernetes-dashboard   NodePort   10.98.252.101   <none>        443:32066/TCP   22h
Access URL
https://172.20.0.104:32066/
Kubernetes Dashboard 접속
- kubeconfig
- Token
Create service account
$ cat «EOF | kubectl create -f -
apiVersion: v1
kind: ServiceAccount
metadata:
name: admin-user
namespace: kube-system
EOF
serviceaccount/admin-user created
Create cluster role binding
$ cat «EOF | kubectl create -f -
apiVersion: rbac.authorization.k8s.io/v1
kind: ClusterRoleBinding
metadata:
name: admin-user
roleRef:
apiGroup: rbac.authorization.k8s.io
kind: ClusterRole
name: cluster-admin
subjects:
- kind: ServiceAccount
name: admin-user
namespace: kube-system
EOF
clusterrolebinding.rbac.authorization.k8s.io/admin-user created
사용자 계정의 토큰을 대시보드에 입력
$ kubectl -n kube-system describe secret $(kubectl -n kube-system get secret | grep admin-user | awk ‘{print $1}’)
Name:         admin-user-token-4fxnw
Namespace:    kube-system
Labels:       <none>
Annotations:  kubernetes.io/service-account.name: admin-user
              kubernetes.io/service-account.uid: f50e282a-67f9-11e9-9202-ecebb898c114

Type:  kubernetes.io/service-account-token

Data
====
ca.crt:     1025 bytes
namespace:  11 bytes
token:      eyJhbGciOiJSUzI1NiIsImtpZCI6IiJ9.eyJpc3MiOiJrdWJlcm5ldGVzL3NlcnZpY2VhY2NvdW50Iiwia3ViZXJuZXRlcy5pby9zZXJ2aWNlYWNjb3VudC9uYW1lc3BhY2UiOiJrdWJlLXN5c3RlbSIsImt1YmVybmV0ZXMuaW8vc2VydmljZWFjY291bnQvc2VjcmV0Lm5hbWUiOiJhZG1pbi11c2VyLXRva2VuLTRmeG53Iiwia3ViZXJuZXRlcy5pby9zZXJ2aWNlYWNjb3VudC9zZXJ2aWNlLWFjY291bnQubmFtZSI6ImFkbWluLXVzZXIiLCJrdWJlcm5ldGVzLmlvL3NlcnZpY2VhY2NvdW50L3NlcnZpY2UtYWNjb3VudC51aWQiOiJmNTBlMjgyYS02N2Y5LTExZTktOTIwMi1lY2ViYjg5OGMxMTQiLCJzdWIiOiJzeXN0ZW06c2VydmljZWFjY291bnQ6a3ViZS1zeXN0ZW06YWRtaW4tdXNlciJ9.TBAStTlp_d7h0lG0bF_yg4YIl5Fg8EjQzgZxN6MzFiUkSWWeKNJGvx9lFOkD7kY6YltRaab1IRlzil28nnmJrgaNBgQyqgHMI_bDDPvX1gAXsI8uy9nz5_Ieiupnri7lYY4BDxMFUMLrF2PMENDuZXR0YQFc4QmKzk61xUygNTpah3H9VM314L4DPex0aQGzkyKYqTp7rtRruH-zgtnySV5myDxXM8fzL6qPkyiJCHNSO-piz-wTiwEpFrf0skWnpERGIjbRshe1lxsb-CSY-_ZhrYHYF04C6lrSB2BKl79Ai4xJBqQ_4DZvwxF-9ATZS3z3HIWtD9DYr_Z2qB4_fQ
Proxy
접속IP를 127.0.0.1에서 외부에서도 접속할 수 있도록 변경하면 아래 토큰으로 인증이 안된다. 토큰 생성을 위와 같이 생성해서 하면 될 수도 있을 것 같다.
외부 접속 프록시 데몬 실행$ kubectl proxy –port=8001 –address=127.0.0.1 –accept-hosts=’^*$’ &$ kubectl proxy –port=8001 –address=172.20.104 –accept-hosts=’^*$’ &
Access URLusage : https://도메인/api/v1/namespaces/kube-system/services/https:kubernetes-dashboard:/proxy/
http://127.0.0.1:8001/api/v1/namespaces/kube-system/services/https:kubernetes-dashboard:/proxy/
Kubernetes Dashboard 접속
- kubeconfig
- Token
토큰을 대시보드에 입력$ kubectl -n kube-system describe $(kubectl -n kube-system get secret -n kube-system -o name | grep namespace) | grep tokenName: namespace-controller-token-2dc64 Type: kubernetes.io/service-account-token token: eyJhbGciOiJSUzI1NiIsImtpZCI6IiJ9.eyJpc3MiOiJrdWJlcm5ldGVzL3NlcnZpY2VhY2NvdW50Iiwia3ViZXJuZXRlcy5pby9zZXJ2aWNlYWNjb3VudC9uYW1lc3BhY2UiOiJrdWJlLXN5c3RlbSIsImt1YmVybmV0ZXMuaW8vc2VydmljZWFjY291bnQvc2VjcmV0Lm5hbWUiOiJuYW1lc3BhY2UtY29udHJvbGxlci10b2tlbi0yZGM2NCIsImt1YmVybmV0ZXMuaW8vc2VydmljZWFjY291bnQvc2VydmljZS1hY2NvdW50Lm5hbWUiOiJuYW1lc3BhY2UtY29udHJvbGxlciIsImt1YmVybmV0ZXMuaW8vc2VydmljZWFjY291bnQvc2VydmljZS1hY2NvdW50LnVpZCI6IjZlZGZmNzI5LTY2NWItMTFlOS1iODA4LTNjOTcwZTkyNjRhMSIsInN1YiI6InN5c3RlbTpzZXJ2aWNlYWNjb3VudDprdWJlLXN5c3RlbTpuYW1lc3BhY2UtY29udHJvbGxlciJ9.TLaAwEopJDuSAVpj1fGWoAp6Kfxectz9RuXA5Sk4ZkL2bFy5lqO0Yb63ONSLM7Eni4xVDdT6OlV6yqhmBwSQd852xRAI06FB-867eogFg_0LmRpvCt8JUMljjP4DChPdJoa_2bEIBEioNqb0bEgVMqSPFNaCY_ZvUt3-Qt29Gd62-owO6pYiZGf8u5Ct6yjC_JnbbagljL85bJIDnjz1TJC6Hx6zY36ETUjIId5O1S90r92tIf3aeahQ_-QbUU-eam_4W4T-sc_MuSnIHEXT-eRKFP000XIdsYwzz0OLAWhnQatYodBvZDaguF_yENtyLI6dftJ-o5xIkZF4ZMR7ygName: namespace-controller-token-m56dg Type: kubernetes.io/service-account-token token: eyJhbGciOiJSUzI1NiIsImtpZCI6IiJ9.eyJpc3MiOiJrdWJlcm5ldGVzL3NlcnZpY2VhY2NvdW50Iiwia3ViZXJuZXRlcy5pby9zZXJ2aWNlYWNjb3VudC9uYW1lc3BhY2UiOiJrdWJlLXN5c3RlbSIsImt1YmVybmV0ZXMuaW8vc2VydmljZWFjY291bnQvc2VjcmV0Lm5hbWUiOiJuYW1lc3BhY2UtY29udHJvbGxlci10b2tlbi1tNTZkZyIsImt1YmVybmV0ZXMuaW8vc2VydmljZWFjY291bnQvc2VydmljZS1hY2NvdW50Lm5hbWUiOiJuYW1lc3BhY2UtY29udHJvbGxlciIsImt1YmVybmV0ZXMuaW8vc2VydmljZWFjY291bnQvc2VydmljZS1hY2NvdW50LnVpZCI6IjdjNjc1YzJhLTY3M2EtMTFlOS05MjAyLWVjZWJiODk4YzExNCIsInN1YiI6InN5c3RlbTpzZXJ2aWNlYWNjb3VudDprdWJlLXN5c3RlbTpuYW1lc3BhY2UtY29udHJvbGxlciJ9.N2RLp8zMLPGspdI8AOA6j_WzpLpFfPxz4cOHiELX62TegUAOTUjHRzox6FhZjwdDLYBuLtPDIaMQXg1BgyuLN1L7zxsEDmp6XoK4SH-caZCwjQUzJejoS_NLAbqoxeQg4qANRajBMUrff2QIJfCm4nxp1dHUIUFRvnChDdB0n-lBZjUM3HhNrovgdzYFhNNRIVBlUSUs1a_JT0L1-9R5UldEFCuAW1RW4IflZYdyZJQMDvH1JB_-bnVysZaqBd0SWg0HOqUOCpDLVGOdrI6GZMpQDFcFCCepnePr9AX08CO-GwwS4oYXw4MzFlYDyzP-6nTWcTSkDvA5R_ZXd2ye9g
NodePort와 Proxy 외에 API Server, Ingress 등으로 서비스 접속 가능
E. configure
F. run application
active service
start service
check service
stop service
G. uninstall kubernetes
If the cluster is node, First delete it from master
$ kubectl drain $NODE_NAME –delete-local-data –force –ignore-daemonsets
$ kubectl delete node $NODE_NAME
Then remove kubeadm completely
$ kubeadm reset
on debian base
$ sudo apt-get purge kubeadm kubectl kubelet kubernetes-cni kube*
$ sudo apt-get autoremove
on centos base
$ sudo yum remove kubeadm kubectl kubelet kubernetes-cni kube*
$ sudo yum autoremove
$ sudo rm -rf ~/.kube
3. post-installation setup
A. create shell script
8. trouble-shooting
kubelet 서비스 기동이 안됨
서버를 재기동하고 Cluster Nodes 확인을 하려할 때 아래와 같은 오류 발생
$ kubectl get nodes
The connection to the server 192.168.100.12:6443 was refused - did you specify the right host or port?
시스템에서 스왑을 사용하면 기본적으로 kubelet이 시작되지 않는다.
a. 스왑 제거
$ sudo swapoff -a
$ sudo systemctl restart kubelet.service
$ sudo service kubelet restart
/etc/fstab 파일의 스왑 라인을 주석 처리하여 영구적으로 적용 # 스왑 마운트 지점 설정 부분을 주석처리하여 다시 시작할 때 마운트 지점을 갖지 않게 설정
b. Kubelet이 스왑을 사용하여 실행되도록 허용
권장사항은 아니지만 아래와 같이 스왑을 사용하여 kubelet을 실행하도록 설정
$ vi /etc/systemd/system/kubelet.service.d/10-kubeadm.conf
Environment="KUBELET_EXTRA_ARGS=--fail-swap-on=false"
$ sudo systemctl restart kubelet.service
$ sudo service kubelet restart
9. Appendix
reference site
-
Kubernetes
https://kubernetes.io/ko/
https://kubernetes.io/ko/docs/setup/pick-right-solution/ -
kubeadm init
https://kubernetes.io/docs/reference/setup-tools/kubeadm/kubeadm-init/ -
Installing Addons
https://kubernetes.io/docs/concepts/cluster-administration/addons/ -
Documentation
https://kubernetes.io/docs/reference/command-line-tools-reference/kubelet/ -
kubernetes를 이용한 서비스 무중단 배포
http://tech.kakao.com/2018/12/24/kubernetes-deploy/ -
우분투 Kubernetes 설치 방법
https://hiseon.me/2018/08/23/ubuntu-kubernetes-install/ -
kubeadm을 사용하여 kubernetes 설치하기 (ubuntu 18.04)
https://medium.com/@dirty49374/kubeadm%EC%9D%84-%EC%82%AC%EC%9A%A9%ED%95%98%EC%97%AC-kubernetes-%EC%84%A4%EC%B9%98%ED%95%98%EA%B8%B0-ubuntu-18-04-61710f0b4db8 -
INTRODUCTION TO KUBERNETES ARCHITECTURE
https://x-team.com/blog/introduction-kubernetes-architecture/ -
IBM Developer : 쿠버네티스 실습(Tutorial)
https://developer.ibm.com/kr/cloud/container/2019/03/05/kubernetes_practice/ -
Creating a single master cluster with kubeadm
https://kubernetes.io/docs/setup/independent/create-cluster-kubeadm/ -
[Kubernetes & Docker] Kubernetes Master Node Install & Setting
https://waspro.tistory.com/363 -
[Kubernetes & Docker] Docker Private Registry Install & Setting
https://waspro.tistory.com/366?category=831751 -
Docker with Kubernetes #5 - Dashboard 설치
https://crystalcube.co.kr/199 -
[Kubernetes] 1.7.x~1.9.x, kubeadm 으로 L3 네트워크 기반 Cluster 구성(with Calico CNI)-3/4
https://bryan.wiki/285 -
Kubernetes completely uninstall
https://medium.com/@meysam1369/kubernetes-completely-uninstall-3f2a83dd985d -
Docker, Kubernetes 환경에서 CUBRID 컨테이너 서비스 해보기
http://www.cubrid.com/blog/3820603 -
쿠버네티스에서 원하는 Node로 Pod 배포하기
http://www.kwangsiklee.com/2019/02/%EC%BF%A0%EB%B2%84%EB%84%A4%ED%8B%B0%EC%8A%A4%EC%97%90%EC%84%9C-%EC%9B%90%ED%95%98%EB%8A%94-node%EB%A1%9C-pod-%EB%B0%B0%ED%8F%AC%ED%95%98%EA%B8%B0/ -
Docker with Kubernetes #9 - Master Node의 HA 구성 https://crystalcube.co.kr/203
-
Elastic Cluster 구성 2 : 메모리, 네트워크 설정 및 플러그인 설치
http://kimjmin.net/2018/01/2018-01-build-es-cluster-2/